Deploy Nuxt SSR to AWS Lambda

Learn how to deploy your Nuxt SSR web application to AWS Lambda with our step-by-step guide. Efficient Nuxtjs serverless deployment approach using AWS SAM framework
Deploy Nuxt SSR Web Application to AWS Lambda
Nuxt 3 is out now and this bring a lot of new capabilites along with support for various deployment solutions like serverless. Nuxt 3 is using new Nitro(https://github.com/unjs/nitro) as its server engine which helps to deploy the nuxt apps with different hosting providers without any additional configuration or packages. Nitro will automatically take care of generating different output formats based on the configuration in nuxt.config or run time and can be deployed to host environment.
For hosting providers such as Vercel, Cloudflare, and Nitro, the appropriate environment is automatically detected and set without the need for extra configuration. However, AWS Lambda does not have this feature, so we must specify the preset in nuxt.config.js or runtime to produce an output format that can be utilized in Lambda. This blog post will cover the process of deploying a Nuxt 3 SSR application in a serverless environment using AWS Lambda through the AWS SAM CLI.
Nuxt AWS Lambda Deployment Architecture
Lets review the architecture of how the web app will be served when we deploy to AWS Lambda,
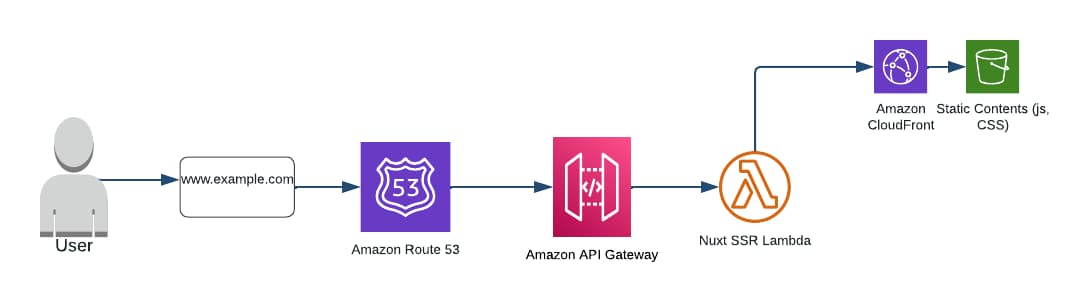
In this architecture, we host all the static files like js and css to the s3 bucket and serve it through the cloudfront. Only the server folder is deployed to the AWS Lambda as zip file.
Nuxt Configuration for the AWS Lambda Deployment
Lets walkthrough on the configuration that is required for the AWS Lambda deployment for nuxt 3 app.
AWS lambda preset on nuxt.config
In the nuxt config, there is a new property called nitro where we can set the preset for the aws lambda so that during the nuxt build, it can generate the output format for the aws lambda.
export default defineNuxtConfig({
  nitro: {
    preset: 'aws-lambda'
  }
})
CDN url to nuxt.config
Let's see how to handle the static contents like css and js files. Ideally it is better to not have these static contents in the lambda package. As these are static content, we can host these in a s3 and serve it through a cloudfront for better performance. Inorder for the lambda code to render the pages correctly with correct css and js files path, it is required to provide the cdnURL during the build process. This property can be set at the nuxt.config.js or during the run time. Below is nuxt.config with cdnurl and aws-lambda preset,
export default defineNuxtConfig({
  nitro: {
    preset: 'aws-lambda'
  },
  app: {
    cdnURL: 'https://example.cloudfront.net/'
  }
})
With this configuration, when you do npx nuxt build, the build output are generated in the .output folder.
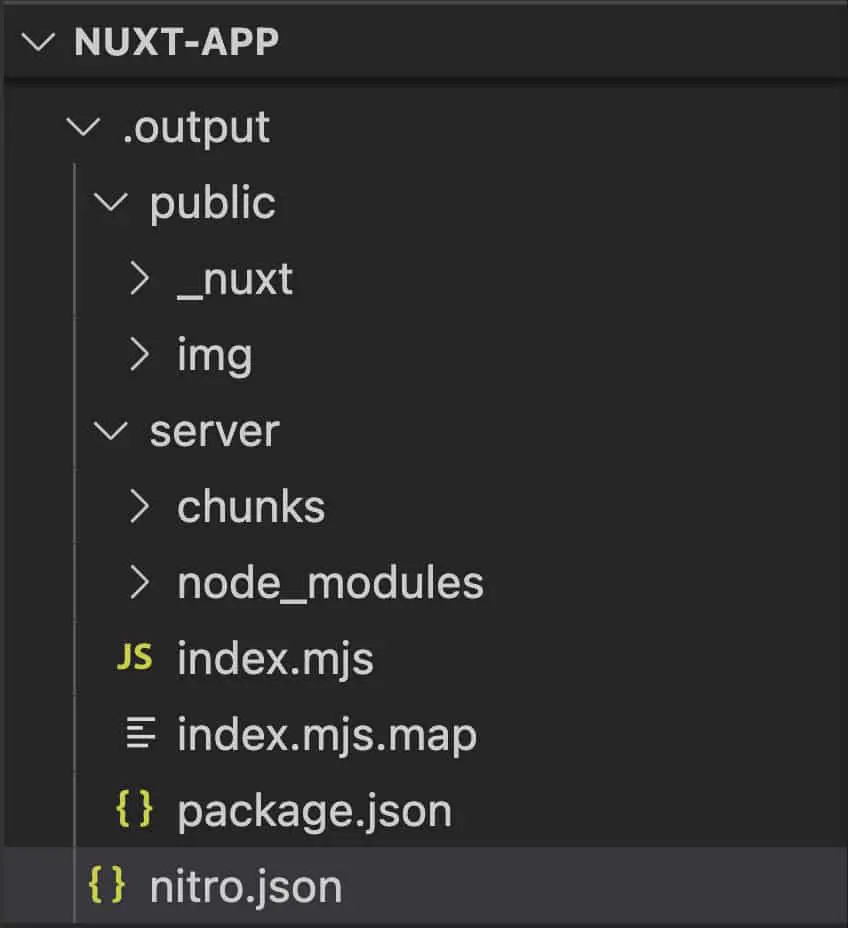
The public folder contains all the static contents like images, js and css files. The server folder contains the code that can be packaged and deployed to the lambda. The index.mjs is the handler file and the handler function is the lambda handler.
AWS SAM Template and Configuration for Nuxt 3 Lambda Deployment
Now lets talk about the AWS SAM template and see how we can deploy the generated server folder to lambda and public folder to s3. This reference implementation use the AWS API Gateway HTTP type and attach the default path to the nuxt lambda.
AWSTemplateFormatVersion: '2010-09-09'
Transform: AWS::Serverless-2016-10-31
Description: >
  Nuxt 3 Serverless SSR in AWS
Parameters:
  StageName:
    Type: String
    Default: $default

Resources:
  HttpApi:
    Type: AWS::Serverless::HttpApi
    Properties:
      StageName: $default
      Domain:
        DomainName: example.com
        CertificateArn: arn:aws:acm:region:accountid:certificate/certificateid
        EndpointConfiguration: REGIONAL
        Route53:
          HostedZoneId: hostid
  HttpApiFunction:
    Type: AWS::Serverless::Function
    Properties:
      CodeUri: .output/server/
      Handler: index.handler
      Runtime: nodejs16.x
      Architectures:
        - x86_64
      MemorySize: 128
      Timeout: 100
      Description: Nuxt 3 SSR Lambda
      Events:
        ProxyResource:
          Type: HttpApi
          Properties:
            ApiId: !Ref HttpApi
            Path: $default
            Method: any
NuxtJS Build Server folder deployment as AWS NUXT Lambda
There are two resources in the above sam template and we are first creating the http api with a custom domain attached to it. Here example.com is the custom domain and the traffic from domain is forwarded to api gateway.
The second resource in the template is aws lambda which has the Handler as index.handler , CodeUri as .output/server/. The event configured is of type HttpApi which reference to the HttpApi resource.
NuxtJS Public folder deployment to s3 bucket.
Now lets see how we can deploy the static contents to s3 bucket and serve the content through cloud front. Lets add the s3 and cloud front configuration to the template.yaml and it will create the s3 bucket and cloudfront resources for us. Below is the complete template.yaml which includes all the resource configuration for the creation of s3 bucket, cloudfront and connect cloudfront to s3 bucket.
AWSTemplateFormatVersion: '2010-09-09'
Transform: AWS::Serverless-2016-10-31
Description: >
  Nuxt 3 Serverless SSR in AWS
Parameters:
  StageName:
    Type: String
    Default: $default

Resources:
  HttpApi:
    Type: AWS::Serverless::HttpApi
    Properties:
      StageName: $default
      Domain:
        DomainName: example.com
        CertificateArn: arn:aws:acm:region:accountid:certificate/certificateid
        EndpointConfiguration: REGIONAL
        Route53:
          HostedZoneId: hostid
  HttpApiFunction:
    Type: AWS::Serverless::Function
    Properties:
      CodeUri: .output/server/
      Handler: index.handler
      Runtime: nodejs16.x
      Architectures:
        - x86_64
      MemorySize: 128
      Timeout: 100
      Description: Nuxt 3 SSR Lambda
      Events:
        ProxyResource:
          Type: HttpApi
          Properties:
            ApiId: !Ref HttpApi
            Path: $default
            Method: any

  CloudFrontOriginAccessIdentity:
    Type: 'AWS::CloudFront::CloudFrontOriginAccessIdentity'
    Properties:
      CloudFrontOriginAccessIdentityConfig:
        Comment: 'Serverless website OA'

  CloudfrontDistribution:
    Type: "AWS::CloudFront::Distribution"
    Properties:
      DistributionConfig:
        Comment: "Cloudfront distribution for serverless website"
        DefaultRootObject: ""
        Enabled: true
        HttpVersion: http2and3
        Aliases:
          - "example.com"
        ViewerCertificate:
          AcmCertificateArn: arn:aws:acm:us-east-1:accountid:certificate/certificateid
          MinimumProtocolVersion: TLSv1.2_2021
          SslSupportMethod: sni-only

        # List of origins that Cloudfront will connect to
        Origins:
          - Id: s3-website
            DomainName: !GetAtt S3Bucket.RegionalDomainName
            S3OriginConfig:
              # Restricting Bucket access through an origin access identity
              OriginAccessIdentity:
                Fn::Sub: 'origin-access-identity/cloudfront/${CloudFrontOriginAccessIdentity}'
        # To connect the CDN to the origins you need to specify behaviours
        DefaultCacheBehavior:
          # Compress resources automatically ( gzip )
          Compress: true
          AllowedMethods:
            - GET
            - HEAD
            - OPTIONS
          CachedMethods:
            - GET
            - HEAD
            - OPTIONS
          CachePolicyId: 658327ea-f89d-4fab-a63d-7e88639e58f6
          OriginRequestPolicyId: 88a5eaf4-2fd4-4709-b370-b4c650ea3fcf
          ResponseHeadersPolicyId: eaab4381-ed33-4a86-88ca-d9558dc6cd63
          TargetOriginId: s3-website
          ViewerProtocolPolicy : redirect-to-https

  S3Bucket:
    Type: AWS::S3::Bucket
    Properties:
      # Change bucket name to reflect your website
      BucketName: static.example.com
      CorsConfiguration:
              CorsRules:
                - AllowedHeaders:
                    - '*'
                  AllowedMethods:
                    - GET
                  AllowedOrigins:
                    - '*'
                  ExposedHeaders:
                    - Date
                  Id: myCORSRuleId1
                  MaxAge: 3600

  S3BucketPolicy:
    Type: AWS::S3::BucketPolicy
    Properties:
      Bucket: !Ref S3Bucket
      PolicyDocument:
      # Restricting access to cloudfront only.
        Statement:
          -
            Effect: Allow
            Action: 's3:GetObject'
            Resource:
              - !Sub "arn:aws:s3:::${S3Bucket}/*"
            Principal:
              Service: "cloudfront.amazonaws.com"
            Condition:
              StringEquals:
                'AWS:SourceArn': !Sub "arn:aws:iam::cloudfront:accountid:distribution/{CloudfrontDistribution}"
Deployment Steps to AWS Lambda
Now we have all the configuration ready, the last step is to deploy the code to lambda and copy static contents to s3 bucket. Lets achieve all these using a shell script.
npx nuxt build
sam validate
sam deploy --profile aws-profile --region aws-region
aws s3 sync .output/public/ s3://static.example.com --cache-control max-age=31536000 --delete --profile aws-profile --region aws-region
These are the steps which happens when you execute this shell script,
npx nuxt buildwill generate the.outputfolder and this contains theserverfolder andpublicfolder.sam validatewill validate the sam template yaml and wont proceed with deployment if the template is invalid.sam deploywill create all the aws resources and deploy theserverfolder to lambda.- In the last step, the contents of the public folder are copied to the s3 bucket.
This will deploy the nuxtjs ssr build to aws lambda and can access it using the api gateway end point or the custom domain defined in the template yaml.
If you're interested in deploying an entire static Nuxt.js 3 website on S3 and CloudFront, feel free to check out my blog post on the subject. Furthermore, you can explore additional information on creating a production-ready Dockerfile for Nuxt 3 in this newly published blog post.